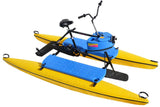
- The Explorer
- Explorer Air
- Tandem Explorer
- Angler
- Assembly Instructions
- Maintenance Tips
- F.A.Q.
- Pictures
- Videos
- Guarantee
- Fishing
- Exercise
- Eco Friendly
- Testimonials

Hydrobike Service and Maintenance Tips
 Download our handy PDF for 'Suggested Fresh and Salt Water Maintenance'
 - Maintenance Schedule
- Drive Train Lubrication
- Salt Water Environment Maintenance
- Replacement of Lower Seals
- Setting the Revla seat height
- Clean fishing line from Axle Prop
Maintenance Schedule
The EXPLORER requires very little maintenance.
There are only a few things you need to do:
Once A Day Saltwater
After using the Hydrobike EXPLORER in saltwater, be sure to wash the floats and frame with soap and water, or at least hose the EXPLORER down with water. Also, re-lubricate the chain with non-toxic USDA approved lubricant to preserve the environment. This is the same lubricant used inside the drive train and to lubricate the friction-lock (do not use petroleum based lubricants; they can deteriorate the friction lock and cause need to replace). This lubricant can be purchased from Hydrobike Inc. on our website. See replacement parts list on the back of the manual for part number.
Once a Week During Use
Lubricate the corrosion-resistant chain with the same lubricant as above. This makes the chain quieter and more efficient.
If the drive train seems to stiff when moving up and down, lubricate the friction lock with 2-4 drops of this approved lubricant, as needed. Excess lubrication of the friction-lock will reduce the friction-lock's ability to provide reverse thrust capability.
With repeated use or in rental situations, lubricate the seat post with 1-2 drops of this lubricant.
Once a Year - Winterize
Change the drive train lubricant, as described in the owners manual. Hydrobikes Inc. Products drive train lubricant is the same USDA approved lubricant as above lubricant. Your drive train lubricant kit comes with replacement drain plug seals and an easy to use funnel-top bottle. Failure to use this type ecologically safe, high pressure, non-toxic, commercial grade lubricant or an equivalent will void the one (1) year drive train warranty.
Cleaning the EXPLORER
You may clean the floats and bike frame with soap and water.
CAUTION
Do not wax the floats. This will make the tops of the floats slippery and could cause injury from falling.
CAUTION
Do not oil, lubricate, or grease the steering bushings. This will attract sand/dirt or debris that will cause abrasion and reduce the life of the bushing. This nylon bushing is blended with PTFE and requires no lubrication.
Drive Train Lubrication - Annually
It's recommended that you annually replace/refresh the drive train lubrication. If the drive train is not lubricated annually, water replaces the drive train oil, which causes the drive train to seize up and ultimately fail. Remedy: check oil for water or evidence that prop seals have failed two or three times annually in areas where fishing line could be present and change oil annually. This tip could be worth over $800, the cost of replacing the Drive Unit. Below are pictures of a drive train that has been lubricated properly and one that has not been lubricated properly.
We do have oil kits available for this purpose.
Call 1-888-403-9012 for price and details!
Check the Owners Manual (page 22) for instructions.
 life long buddies - drive train oil & chain oil |
 well kept drive train |
 non lubricated drive train |
Salt Water Environment Maintenance
Chain
Many resorts utilize two chains for each Hydrobike, keeping a spare chain soaking in diesel fuel while operating with the other chain. At the end of one week the chain on the bike is exchanged with the fuel soaked chain and so on week after week. This is very effective since even the best "rust resistant" chain will break down with constant exposure to salt water. The 2-chain rotation method has proven to extend chain life by years.
Seat Post
The seat post should be removed from the frame at least once a month and sprayed with good rust inhibiting oil.
Handlebar Stem (Goose Neck):
Prior to first use (during initial assembly) pack the bottom of the handlebar stem assembly with marine grease where the assembly bolt threads into the diagonally shaped iron nut that is designed to secure the rudder stem with the handlebars. This should be re-packed with grease each season or every 6 months.
Replacement of Lower Seals - Prop Shaft
 Block up drive train in a horizontal position. (propeller up)
Remove screw and pull propeller from shaft.
Use a flat headed screwdriver to hook the inside wall of the seal and pry up, using the edge of the housing away from the tip of the screwdriver for leverage. Do not damage the inside housing surface.
Slide the seal up and over the prop shaft.
The inside seal can be removed by sliding the tip of a small screwdriver down alongside the shaft and "hooking" the center of the seal. Loosen the seal by prying up and remove in a similar manner to the first seal.

Clean the inside wall of the housing and leave it dry.
Replace the inside seal sliding it over the prop shaft, open side down, making sure that the small spring stays in place. Press down on the seal in several areas and make sure it is fully seated.
The outer seal is placed over the prop shaft with "washer" side to the outside. Press down until fully seated.
Slide propeller into the shaft and replace screw.
Setting the Revla seat height
Two basic rules regarding height:
- The higher the handlebars are than the sitting surface of the seat, the more you need to increase the minus Vector.
- The closer the height of the handlebars are to the height of the seat, the more you need to increase the plus Vector.
What you are doing is in effect simply rolling the upright position of your body around the bullnose until you find the most comfortable crease line position. This also solves the following possible problems:
- Too much weight falling onto hands, arms and shoulders - adjust to V-i or lower.
- Too much pressure in the creaseline - adjust to V.0 or V 1 or higher.
There is a critical relationship between the ideal Vector angle and the height of the seat and handlebars from the pedals. (This is also largely true of conventional bicycle saddles.)
Setting the correct seat height for the length of your legs
Position yourself on the Revla seat so that the natural thigh-buttock crease line (where the back of your thighs meets the start of your buttock 'cheeks') sits comfortably on the bullnose leading edge of the Revla seat. With either one of the pedals at its lowest (6 o' clock) position, let your legs dangle naturally and adjust the length of the seat post until your heel dangles just clear of the lowest pedal. You should then find the height of the seat just about right.
Set the handlebars as high as you can
For the Revla seat, your handlebar grips should be at least 6 inches (15cm) higher than the sitting surface of the Revla seat - the higher they are the better. This is not new to cycling. It's the way people used to ride before the designers lost it, causing all kinds of medical problems as a consequence. Today's "Comfort" bikes are leading a return to comfortable leisure and commuter cycling. And the Revla seat is the comfort bike's perfect complementary partner.
Clean fishing line from Axle Prop
Periodically check the axle prop for tangled fishing line. This can cut the axle prop seal and allow water to enter and corrode the axle. You can see how the fishing line bundles up on the prop shaft and works it's way back into the two seals (one to keep the oil in and another to keep the water out). Even though we have redundant protection designed into the seal arrangement it's still highly probable, where there is fishing line present, that this failure mode is likely. The good news is that it's preventable and seal replacement is very simple and the seals are quite inexpensive.
